The Early History Of Photography


The desire to capture images has always been around however, it hasn't always been as simple as it is now in the 21st century with digital cameras, snapchat, Instagram Facebook and so on. It was in 1826 when the possibility of this concept became a reality. Joseph Niépce (Middle) worked together with Louis Daguerre (Right) to create the first "permanent" picture using a silver nitrate chemical which is sensitive to light. This involved a heavy metal plate coated in the chemical and an exposer time of 8 hours. The final picture was very blurry and was not a very convenient way of capturing pictures as by the time the photo had been "taken" the sun would have moved half way across the sky creating multiple shadows (Fig. 1) . After the death of Herschel six years later and with the help of his notes, Daguerre was able to produce a clearer image whilst with a short exposer time using the daguerreotype (Fig. 2). This technique was quickly accepted by the French government and soon became the norm. From here photography quickly took off with the developement glass negatives to film to digital SLR cameras.


The Camera Obscura
|
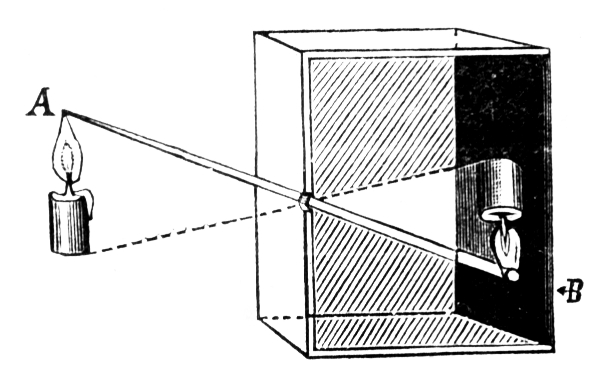
A camera obscura is effectively a box with a little hole on one side and a sheet of tracing paper on the inside. It proves that light travels in straight lines as the top of image 'A' is projected onto the paper upside down at point 'B'. This is because the little hole only allows a certain amount of light into the box as you can see from the lines in the diagram. The tracing paper acts as the lens as moving it further away or closer in determines how sharp the image turns out. Also the aperture controlling the amount of light which enters the box can be changed by increasing the size of the hole.
Originally, artists would have inverted the image, traced it and painted over it |


Photograms
|
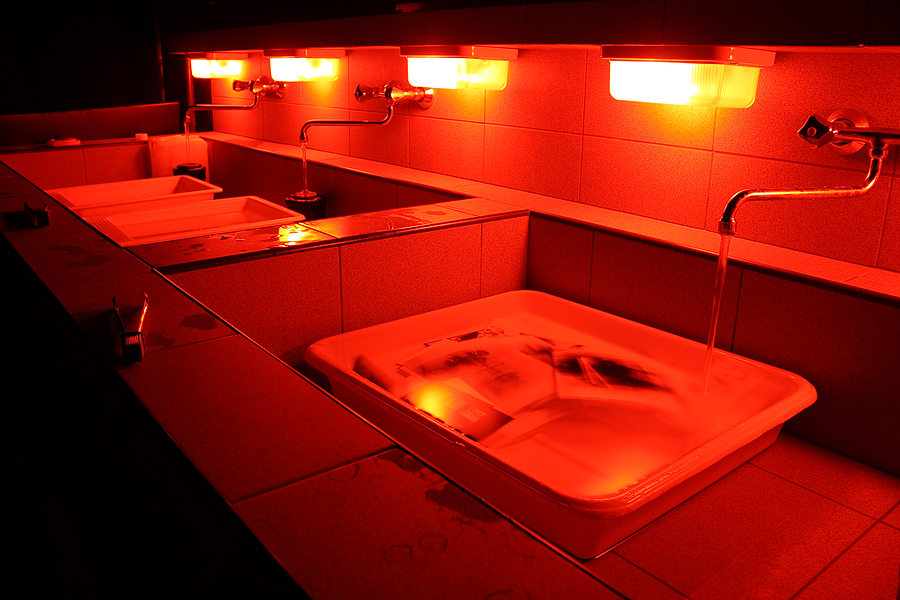
After studying the earliest form of photography we moved into the darkroom and learnt about the equipment and chemicals. Firstly, the room is lit by red light, this is because it has the longest wavelength on visible light spectrum and due to its low energy it does not affect the production of photographic paper. Chemicals used in the process of making a photogram or other types includes the developer, stopper and fixer. The developer converts the latent image into a visible one. Usually an image will be placed in here for around 2 minutes. Next is the stopper. This stops the image from developing any further and appearing darker (around 30 seconds). After comes the fixer. This stabilises the image and removes any remaining silver halide on the photographic film (2 minutes). Finally a water bath is needed to wash off any remaining chemicals. |

|

Headphones and Leaves
(exposed for 4 seconds)

|
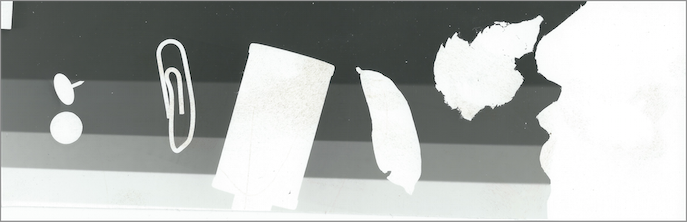
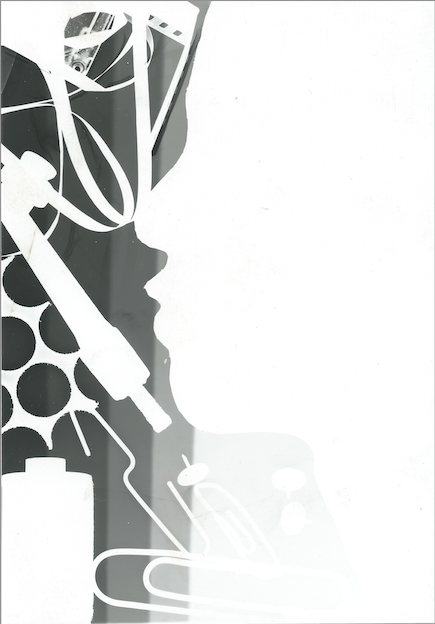
Photograms are produced by placing objects on photographic paper and exposing it to white light. By doing this parts of the paper which are covered by objects block light from passing through and reacting with the paper. As a result these parts appear lighter than the areas around which have reacted with the white light (this is called a negative). The amount of light exposed can be controlled by changing the aperture, focal length and exposer time on the enlarger.
We tested how to exposer time effected the darkness of the end image on test strips by using a piece of opaque card and moving it across the paper. As you can see from the image above the longer the paper is exposed, the darker it gets. By using this as an example we were able to decide how many seconds was the best producing photograms. We also learnt 2 methods of altering photograms. The first was called sandwiching. This process involved a negative, photographic paper and a sheet of glass. This would create a positive by sandwiching the negative in-between the glass and photographic paper as the darker areas of the image would not allow light to pass through as easily as the lighter parts because of the crystals in the darker areas. The second method is called solarising. After choosing objects and exposing the paper to white light you would place it in the developer until a slight image appears, then quickly remove it and expose it to light again for another 1 or 2 seconds. By doing the crystals expand slightly from the light as they have not fully formed from the developer. Unfortunately, I was not able to produce one however the effect it would have would be like on the headphones in the image on the left. MAN RAY |
Pinhole Cameras
|
Returning to the topic of the history of photography, we made pin hole cameras out of used Pringles cans, duct tape and photographic paper. As you can see from the slideshow on the right, the can was wrapped inside and out with duct tape. This ensure no light enters the can and tempers with the image on the photographic paper inside. Because the pinhole camera works the same way as a camera obscura, a hole was made on the side to allow light to enter and react with the photographic paper. The foil over the hole makes sure not too much light enters the can.
|
|
The pinhole camera works by projecting an image onto the photographic paper at the back of the can and holding a negative version of what is being captured. The exposure time determines how the picture turn out. Below is a election of exposure times of the same setting. As you can see, the shortest exposure time (5 seconds) produced the lightest image whereas the longest (10 seconds) was the darkest, the image is also slightly blurry, this is because there was movement in the background. After developing the pinhole pictures in the dark room we learnt some mistakes and realised the most appropriate amount of time would be around 7 seconds and to hold the can as still as possible. Because these pictures were negatives I used the sandwiching technique to create a positive image (see below).


Film Cameras
|
Pinhole cameras are one of the earliest forms of photography which allow us to produce a physical image. In the late 19th century SLR (single lens reflex) film cameras were invented. These had the ability to control the amount of light entering into the camera by two methods, the aperture and the shutter speed. Our task was to test how changing the aperture setting would affect the photograph when gradually increased whilst the shutter speed was kept at a constant speed. And vice versa for the shutter speed setting (same aperture throughout).
|

|
After working with film cameras we realised achieving the balance between shutter speed and aperture was crucial to produce a clear image. Doing this manually on the film cameras required us to adjust the aperture and shutter speed. The aperture (measure in f-stops) on a camera is a ring of metal blades, which can alter the size of a hole in the lens also controlling the amount of light let into the camera and onto the film. A large aperture will often mean a certain subject will be focused on and anything else will be blurry; a small one however will have a larger range of focus. We learnt that the shutter speed is the length of time the shutter is open on a camera (measured in seconds or fractions of seconds). As a result the longer the shutter speed, the more amount of light is able to enter the camera and affect the film. A long exposure will often ruin photos unless the lighting is ideal for the amount of time (low lighting) or the photographer and subjects in the photo are completely still. However photographers can use exposer time to their advantage by capturing movement on a motor way of creating images with light sources.
Shutter Speed
When it comes to using digital cameras it is the same concept in terms of shutter speed and aperture. Therefore we explored how increasing the shutter speed whilst photographing a moving subject affected the image as the film was exposed longer to light. This was accomplished by setting the aperture to f/12 and keeping it constant. This way it also shows how the exposure time can have an overall affect on the lighting in the photo. As you can see below, the first 3 images are fairly crisp and clear. This is because the shutter speed ranges from 1/4000th, 1/1000th and 1/500th of a second meaning the camera is able to capture the movement quickly without any motion blur or over light exposer. On the other hand, the bottom 3 photos were taken with longer exposure times. As you can see there is motion blur in the image (especially the last).This is because the camera was attempting to capture too much information in a longer period and as a result the subject was seen in the multiple locations throughout the exposure time. Motion blur is often used by photographers or in adverts to emphasise movement for example in a waterfall or to show the speed of a car.


Ultimately, this can be summed up as short shutter speeds freeze action while long shutter speeds create an effect of motion.
Aperture & Depth of Field

|
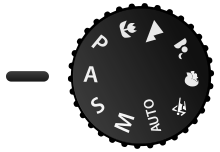
After experimenting with various shutter speeds the next step was to observe how changing the size of the aperture affected the depth of field in the photo using digital cameras. Firstly we had to select shutter priority by twisting a dial to 'S'. By doing this, the camera automatically adjusts the shutter speed according to the aperture. For example if f/4 had been selected then a short shutter speed will be used and vice versa in order to balance the light entering the camera. The second step was to choose what apertures we would use (by changing the dial to 'A' ). For this test I decide to use 2 extremes and a middle value as it would easily display the depth of field depending on the aperture size.
|

|


